
You can convert images and reduce their size using the built-in Quick Actions feature on your Mac.
Convert Your Image to Another Format or Just Make it Smaller Effortlessly Using the Quick Actions Feature on Your Mac
In this day and age, we don’t convert images or make them smaller that often. But when the need does arise, we end up downloading an apps or two to do such a simple thing.
If you have a Mac, you will be pleased to learn that the built-in Quick Actions feature lets you convert an image to another format and even reduce its size so that it is easy to send over an email.
This feature is so underrated, everyone should know about it. And today is your lucky day as I’m going to do just that.
Step 1. Find the image you want to resize. If the photo is in the Photos app, drag it to the desktop for easy access.
Step 2. Right-click on the image.
Step 3. Go all the way down to ‘Quick Actions.’
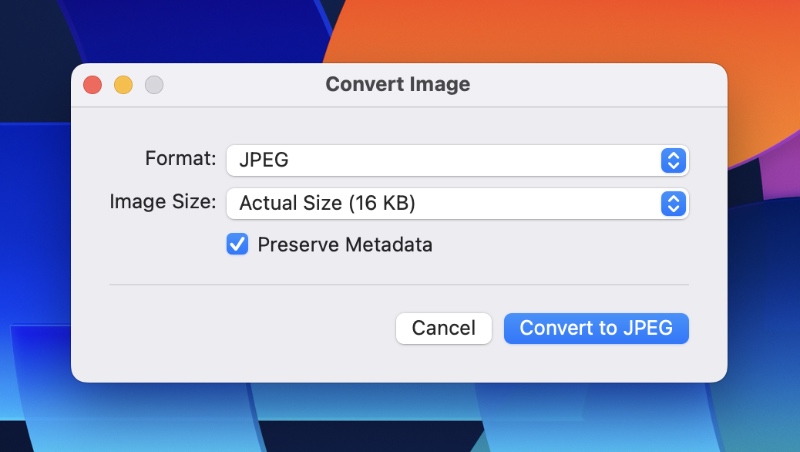
Step 4. Now click on ‘Convert Image.’

Step 5. You’ll see a bunch of options here. Select the format you want to covert the image to, choose the image size as well and then click on ‘Convert.’ The new image will be saved to your desktop.
Once the image has been saved, you can do anything you like with it. You can send it off in an email, AirDrop it to someone or just post it to social media.
There are other useful things Quick Actions can do as well. For example, you can remove the background from an image using this feature, which you can do from the Preview app as well. It’s great to see macOS giving everyone multiple choices to do the same thing.
The name ‘Quick Actions’ might throw some people off as it gives out Shortcuts app vibes. Trust me, it is nothing like that and there’s no learning curve to it at all. You can dive right into it and start using it however you want.

![Download: Microsoft Copilot App for Mac [Direct Link]](https://www.anotherapple.com/wp-content/uploads/2025/02/microsoft-copilot-for-mac-official-300x169.jpg)


