

Instagram for iPhone uploads low quality videos by default. Here’s how you can set it to upload high quality videos every single time.
Videos Don’t Look Good Enough on Instagram? You Can Bump up the Quality by Simply Changing One Setting
You’re reading this tutorial because you love Instagram and can’t seem to live without it. It’s okay, we’re all on the same boat, and there are certain things needed to be done in order to enhance the overall experience of this particular social platform further on iPhone.
Did you know, you can actually upload high quality video on Instagram? That feature is turned off by default and the toggle switch for it is hidden deep inside the Settings menu. Thankfully, a lot of people have found it, so has yours truly and I will show you how you can enable it, too.
Enable High Quality Video Uploads on Instagram for iPhone
Step 1. First and foremost, launch the Instagram app on your iPhone.
Step 2. Tap on your profile picture in the bottom right of the app.
Step 3. Tap the hamburger icon – one that looks like three lines on top of each other – on the top right.
Step 4. You’re now in the ‘Setting and activity’ section. Scroll all the way down and find the ‘Your app and media’ section.
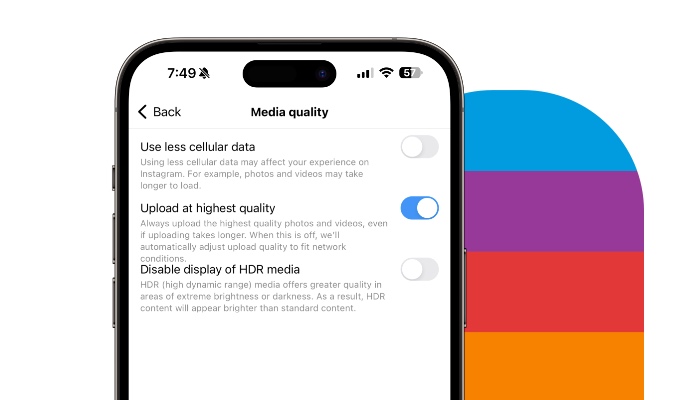
Step 5. Simply tap on ‘Media quality’ to open it.

Step 6. Now enable the ‘Upload at highest quality’ setting as shown in the screenshot below.
Every time you upload a video to Instagram, it will be sent out in the best possible quality. While that is exactly what you want, do keep in mind that this sort of thing is going to be taxing on your data plan. If you’re living the unlimited-data-plan life then it’s all well and good. Metered plan users should think twice before enabling this toggle switch as it can spread a little bit of havoc on your pocket.
Is the difference big enough for you to enable this feature? Definitely, especially if you want to stand out as a high quality content creator. In outdoor environments, every pixel matters and a little bit of artifact-ing can throw people off. You want that engagement at all costs, don’t you?
In the very same settings menu, you’ll find the option to turn off HDR media, which means your iPhone’s display won’t blind you when high dynamic range content shows up in your timeline, especially in Reels. Personally, I leave it on. Content shot in HDR gives you a chance to appreciate your iPhone’s glorious Dolby Vision display.


