
You can force your Mac to use the 160MHz Wi-Fi channel width for increased throughput and faster internet speeds.
A Simple Toggle Switch Forces Your Mac to Use 160MHz Channel Width Over Wi-Fi All the Time
160MHz channel width is supported on Wi-Fi 6, 6E and 7 routers, but not all models.
You have to check the manufacturer’s website to make sure your router supports it and that it is enabled.
If you do own a Wi-Fi router that supports the 160MHz channel width, chances are high your Mac might not be using it all the time.
But Why?
See, the thing is, your Mac intelligently decides which channel width to use, ensuring you’re using a set of channels that has the least amount of interference.
What this means is, if you have a very fast internet plan, and your Mac rolls you back to a smaller channel width, let’s say 80MHz or 40MHz, then you won’t get your advertised speeds over Wi-Fi.
Don’t Worry, You can Force 160MHz
But, you can force your Mac to use the 160MHz channel width. Which means you’ll get faster internet download speeds and overall better throughput over wireless.
It Does Come at a Cost
However, there is a chance you might encounter some interference while on such a wide channel width.
Issues while streaming video, websites feeling choppy are some of the things that are to be expected, especially if you are using DFS channels that are crowded from time to time.
It basically gets worse if you live in an area where there’s a radar system nearby. A single sweep is enough to disrupt real-time activities such as video calling, gaming, etc.
If you don’t care about that at all, and still want to use 160MHz channel width, then keep on reading.
Your Mac Must Support 160MHz Width too
Not every single Mac supports the 160MHz channel width. Any Mac with Apple’s M2 chip or higher inside supports it.
M1 Macs are not supported at all, but there is something for you in here as well, and I’ll tell you why later.
How to Force 160MHz Channel Width
Step 1. Launch System Settings on your Mac.
Step 2. Click on Privacy & Security on the left.
Step 3. Click on the Details button next to System Services.
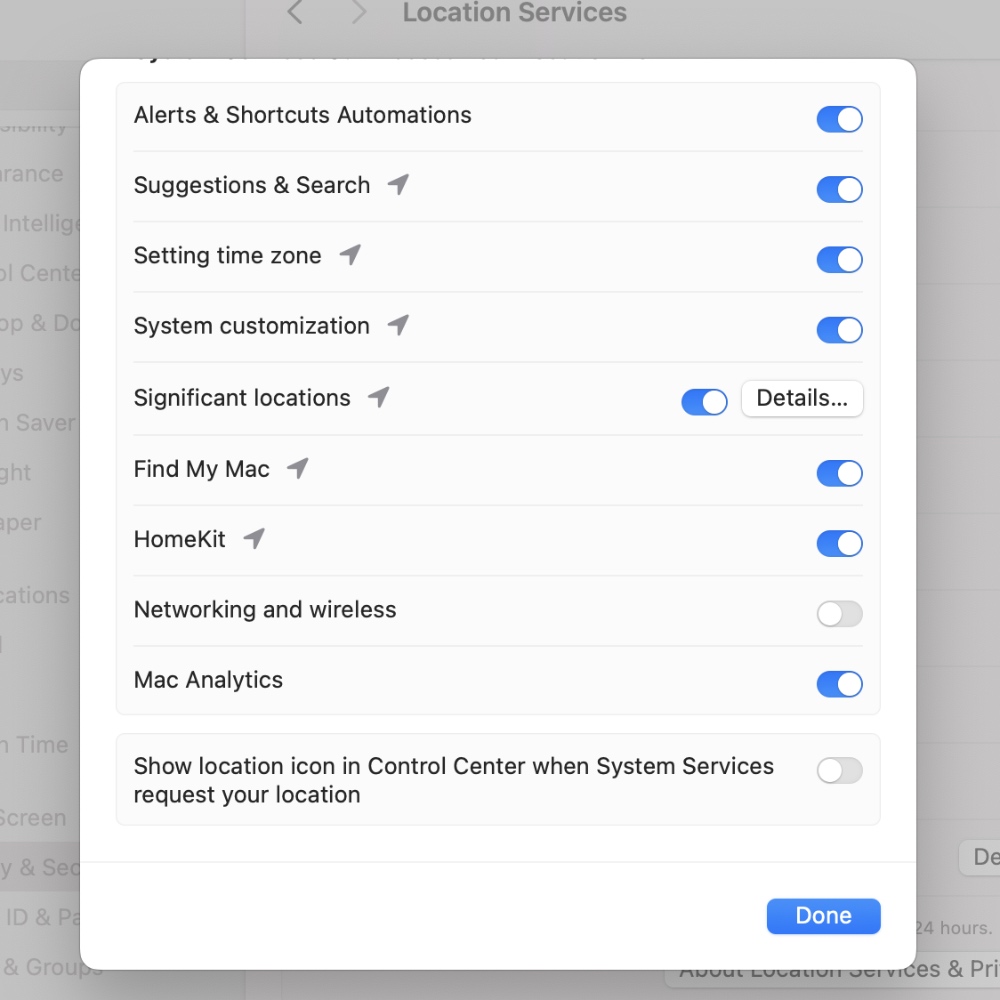
Step 4. Find the Networking and Wireless toggle switch and disable it as shown in the screenshot below.
Assuming you have a Wi-Fi router that supports 160MHz channel width and it is enabled, you can test out whether or not your Mac is consistently using the 160MHz channel.
On the menu bar, click on the Wi-Fi icon while holding down the Option key on the keyboard. You’ll now see a bunch of extra information related to your Wi-Fi and all you have to look for is Channel as shown in the screenshot below:
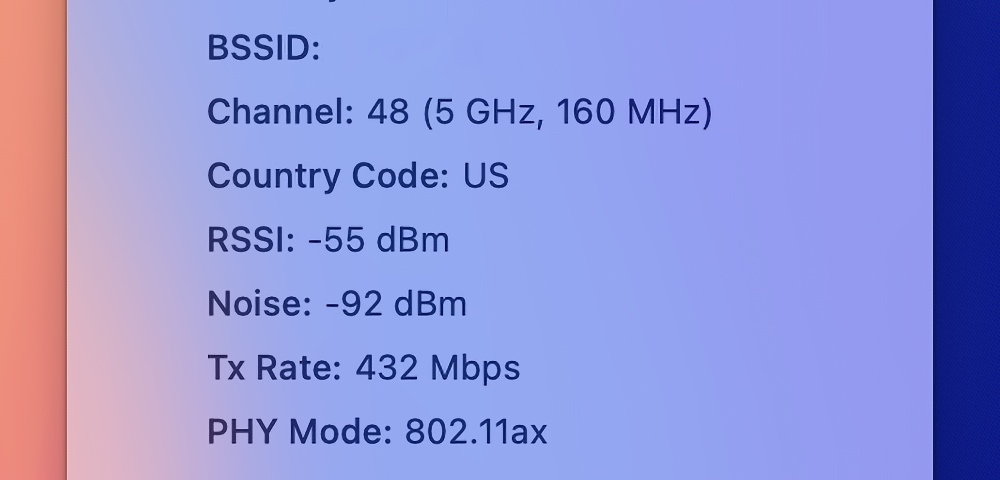
I’m sitting very far away from my Wi-Fi router and my MacBook Air is still connected to 160MHz width.
If you have an older Mac, this tutorial will work for you as well since you’ll use the widest channel your Mac supports. This means your M1 Mac will use 80MHz width rather than 40 or 20MHz even if there’s slight interference around you.
Do I Recommend it?
Though fast speeds are fun to have around, I prefer a more stable Wi-Fi connection above all else. Just let your Mac decide what’s good for you, and you’ll be fine.


![Download watchOS 11.4 Update for Apple Watch [Update]](https://www.anotherapple.com/wp-content/uploads/2025/03/watchos-11.4-final-update-300x169.jpg)

