
Here’s a step-by-step tutorial on how to use IPv6 only on your Mac and disable IPv4 completely.
You Can Exclusively Use IPv6 on Your Mac and Disable IPv4 Completely in a Couple of Clicks
Chances are high that your ISP is using the IPv6 protocol, but it is doing so alongside IPv4, which makes perfect sense because it doesn’t want to break the internet for you.
While new websites and services are IPv6-ready (and some, IPv6-only) you’ll be surprised to learn how many things on the internet rely on IPv4 exclusively.
Mainly because the protocol has been around for a long time, and there’s a huge legacy infrastructure that can’t be replaced overnight, and adoption of IPv6 is kind of slow.
Having said that, IPv6 is better in every single way imaginable and offers better routing and security capabilities compared to IPv4.
If you want to use IPv6 exclusively on your Mac and want to disable IPv4, then you will be pleased to learn that you do have that option.
But I’m dropping a warning right now: using IPv6 exclusively may break the Internet for you. Services that are IPv4 only may not load at all. This includes a ton of websites.
Make Sure IPv6 is Enable on Your Router
If you’re using your ISP modem and router combo, then IPv6 is likely enabled by default. You can run a quick test online to see if it’s enabled by your ISP.
Go to this website and find out: test-ipv6.com
Using your own Wi-Fi router? Head over to its settings using your web browser, go to the IPv6 settings page, and make sure it’s properly configured. You might want to call up your ISP for this one.
Assuming IPv6 is up and running on your internet, move on to the next step.
Disable IPv4 Completely
Step 1. Click on the Wi-Fi icon in the menu bar at the top of the display.
Step 2. Click on Wi-Fi Settings at the bottom.
Step 3. Click on the Details button next to the Wi-Fi network’s name you’re connected to.
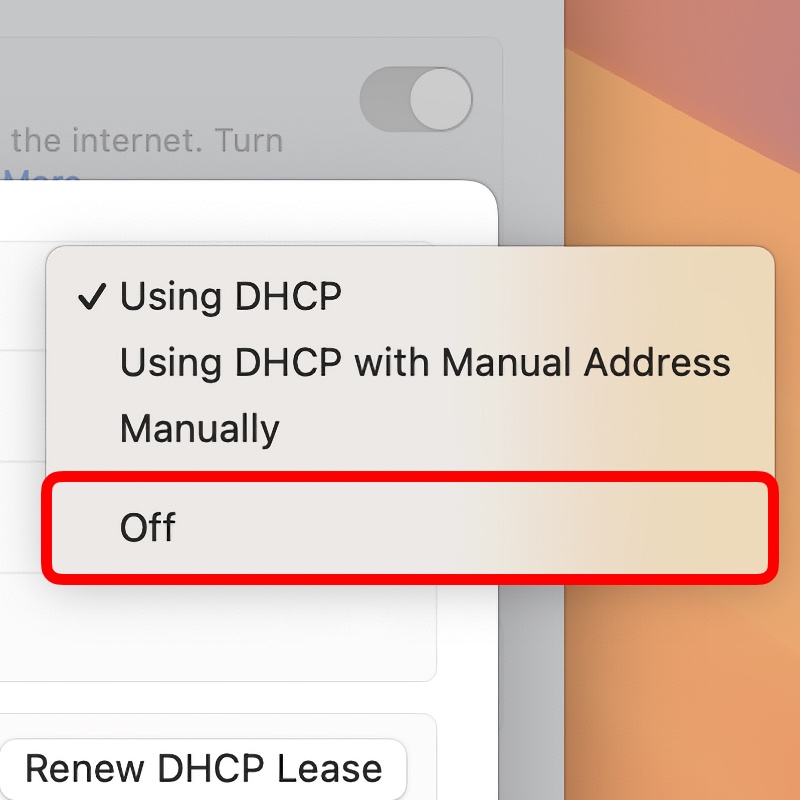
Step 4. Click on TCP/IP on the left.
Step 5. Right at the top you should see Configure IPv4 set to Using DHCP. Simply click on Off to disable it.
Step 6. To make sure the settings propagate correctly throughout your Mac, turn off Wi-Fi and back on again.
That’s it, your internet on your Mac is now IPv6-only.
I will highly recommend testing your new settings to ensure everything is working fine. Chances are high you will be back to enabling IPv4 in a short period of time.
Just follow the steps above once again and select “Using DHCP” in step 5. That’s all you have to do.


