

Don’t want to use your Mac as an AirPlay receiver? You can turn the feature off in a few easy steps.
Turn off the AirPlay Receiver Feature on the Mac if You Don’t Want to Use it with Your iPhone and iPad
With the latest versions of macOS, you can use your Mac as an AirPlay receiver. What this means is, you can AirPlay stuff from your iPhone or iPad to your Mac’s big screen, such as photos, videos, movies, TV shows – you name it.
Basically, the feature turns your Mac into an Apple TV (without tvOS, obviously) and it’s a useful feature, especially if you have an iMac with a large display and don’t own a TV.
If you don’t want to use this feature and wish to turn it off, you can do that, too. The feature is called ‘AirPlay Receiver’ and you can turn it off immediately – here’s how.
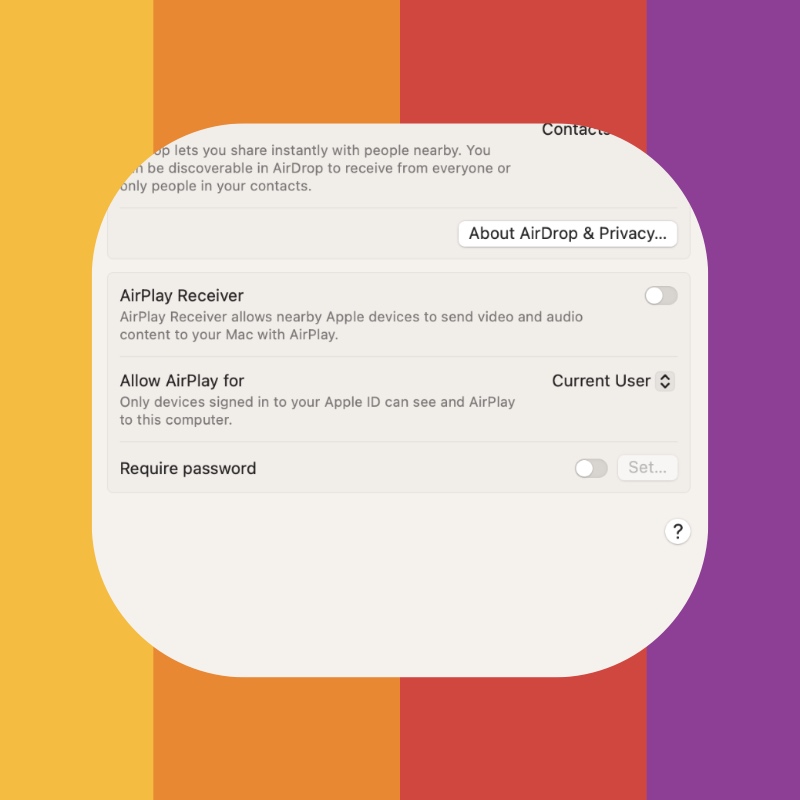
Step 1. Launch ‘System Settings.’
Step 2. Now go to ‘General.’

Step 3. Click on ‘AirDrop & Handoff.’
Step 4. Turn off ‘AirPlay Receiver.’ That’s it.
With the feature turned off, your Mac will not show up as an AirPlay device on your iPhone and iPad.
Instead of completely turning the feature off, you can limit it to how it works instead. There’s a chance you accidentally enabled the feature in such a way that your Mac shows up for everyone on the network as an AirPlay receiver. So, instead of turning the feature off completely, set it back in a way that it only shows up for you only. You can do this by going to System Settings > General > AirDrop & Handoff and just set ‘Allow AirPlay for’ to ‘Current User.’

By doing this, any device that isn’t signed in with your Apple Account won’t be able to see your Mac on the network as an AirPlay receiver.
Honesty, this is the kind of feature that makes the Apple ecosystem so great. I don’t know why anyone would want to turn it off just like that unless you have someone at home that picks up your iPhone and iPad just to constantly AirPlay stuff on your Mac while sitting in the other room. In that case turning AirPlay Receiver off on your Mac makes perfect sense.


